Cable trays and cable ladders are indispensable components in modern electrical wiring systems, providing organized support and protection for cables and wires. These systems play a crucial role in ensuring the safety, efficiency, and longevity of electrical installations across various industries, including construction, manufacturing, and telecommunications. Proper installation and maintenance of cable tray and cable ladder systems are vital to maximize their benefits and minimize potential risks. This comprehensive and in-depth guide delves into the intricate aspects of installing and maintaining these essential components, offering detailed insights, recommendations, and best practices.
Planning and Design
The success of any cable tray or cable ladder installation project is heavily dependent on thorough planning and meticulous design. Consider the following factors when designing your system:
a. Load capacity: Conduct a thorough assessment of the total weight of the cables, wires, and other equipment that will be supported by the tray or ladder. Ensure that the chosen system has sufficient load-bearing capacity to accommodate these loads without deformation or failure. Account for future expansion or modifications that may increase the load.
b. Cable types: Identify the types of cables that will be installed in the system, including their dimensions, insulation materials, voltage ratings, and specific requirements. Choose a cable tray or ladder that is compatible with the cables and can provide adequate support and protection against mechanical stress, environmental factors, and electromagnetic interference (EMI).
c. Environmental conditions: Take into account the environmental factors that may affect the performance and durability of the cable tray or ladder system. Consider temperature extremes, humidity levels, exposure to chemicals or corrosive substances, UV radiation, and the presence of dust, dirt, or other contaminants. Select materials and coatings that offer resistance to these factors.
d. Accessibility and pathways: Ensure that the cable tray or ladder system is designed with ease of access in mind, allowing for convenient maintenance, repairs, and future modifications. Consider factors such as clearance space, pathway routing, and the use of removable covers or access panels. Plan for proper segregation of cables based on their function, voltage level, and safety requirements.
e. Fire protection and safety: Comply with fire safety regulations and standards by selecting fire-rated cable trays and ladders if required. Implement appropriate firestop solutions at penetrations and transitions to maintain fire barriers and prevent the spread of flames and smoke.
f. Documentation and labeling: Develop detailed documentation of the cable tray or ladder system’s layout, components, and specifications. Implement a labeling system to identify cables, junctions, and accessories, making it easier for maintenance personnel to locate and address issues.
Installation
Proper installation of cable trays and cable ladders is critical to ensure their effectiveness and safety. Follow these steps for a successful installation:
a. Site preparation: Thoroughly assess the installation site, removing any obstacles or hazards. Ensure that the supporting structures, such as walls, pillars, or suspension systems, are sturdy and capable of bearing the load of the cable tray or ladder. Address any structural deficiencies or concerns before proceeding with the installation.
b. Support structure installation: Install the necessary support structures according to the manufacturer’s recommendations and local building codes. This may involve attaching brackets, hangers, or other mounting hardware to the supporting structures using appropriate fasteners and anchoring methods.
c. Tray or ladder assembly: Follow the manufacturer’s instructions to assemble the tray or ladder sections, ensuring that they are securely connected and aligned. Use appropriate fasteners, such as bolts, screws, or rivets, to join the sections together. Pay close attention to corners, joints, and connections to ensure they are strong and stable.
d. Accessory installation: Add accessories such as fittings, connectors, bends, tees, crossbars, and covers as needed to complete the system and provide additional support or protection for the cables. Ensure that all accessories are properly secured and aligned, and that they do not interfere with cable routing or accessibility.
e. Cable routing and securing: Carefully route the cables through the tray or ladder, ensuring that they are properly spaced and secured to prevent damage, interference, or excessive sagging. Use cable ties, straps, or other suitable fastening methods to secure the cables in place, adhering to industry standards and best practices.
f. Grounding and bonding: Implement proper grounding and bonding practices to protect against electrical faults and ensure compliance with applicable codes and standards. Connect the cable tray or ladder system to the facility’s grounding system using approved methods and materials, such as copper conductors, clamps, and bonding jumpers.
g. Testing and commissioning: Perform a series of tests and inspections to verify the correct installation and functionality of the cable tray or ladder system. This may include visual inspections, continuity testing, insulation resistance testing, and functional testing of associated equipment. Document the results and obtain the necessary approvals before placing the system into service.
Maintenance
Regular maintenance is essential to keep your cable tray and cable ladder system in optimal condition and prevent potential issues. Here are some key maintenance tasks to consider:
a. Inspection and monitoring: Establish a routine inspection schedule to monitor the condition of the cable tray or ladder system. Conduct visual inspections at regular intervals, paying close attention to signs of damage, wear, or corrosion. Monitor the system’s performance and record any anomalies or deviations from expected behavior.
b. Cleaning and debris removal: Regularly clean the cable tray or ladder system to remove dirt, debris, or contaminants that may accumulate over time. Use appropriate cleaning methods and materials that are safe for the system and the environment. Avoid using harsh chemicals or abrasive tools that could damage the cables or the tray/ladder.
c. Cable management and organization: Periodically review and reorganize the cables within the tray or ladder to ensure they are properly spaced, labeled, and secured. Replace worn or damaged cable ties, straps, or other fastening devices as needed. Implement additional supports or dividers to separate and organize cables based on their function, voltage level, or safety requirements.
d. Load assessment and redistribution: Assess the weight of the cables in the system periodically to ensure that they remain within the load capacity of the tray or ladder. redistribute the cables as needed to prevent overload and ensure even distribution of the load.
e. Repair and replacement: Promptly address any defects, damages, or failures identified during inspections or routine maintenance. Repair or replace damaged components, such as trays, ladders, accessories, or fasteners, using approved methods and materials. Document all repairs and replacements for future reference.
f. Updating and upgrading: Stay informed about advancements in cable tray and ladder technology, materials, and best practices. Evaluate your system periodically to identify opportunities for improvement or upgrades that can enhance its performance, safety, or energy efficiency.
g. Training and documentation: Provide ongoing training for maintenance personnel and other stakeholders on the proper installation, operation, and maintenance of cable tray and ladder systems. Maintain up-to-date documentation, including manuals, diagrams, and records of inspections, repairs, and modifications, to facilitate efficient and effective maintenance activities.
Proper installation and maintenance of cable tray and cable ladder systems are paramount for ensuring the safety, efficiency, and reliability of electrical installations across various industries. By following the in-depth guidelines and best practices outlined in this comprehensive guide, you can help maximize the benefits of these essential components while minimizing potential risks and downtime. Stay vigilant in your efforts to maintain and improve your cable management system, and it will continue to serve your facility well for years to come.
Cable Ladder Installation Step-by-Step Guide Pro Tips
Installing a cable ladder system may seem daunting, but with the right guidance, it becomes a straightforward task. Whether you’re a DIY enthusiast or an experienced technician, this comprehensive guide will walk you through each stage of the process. We will provide essential tips and insights to ensure a seamless installation, while also exploring various cable tray expansion guides and fixing methods. Let’s dive into the world of cable management with these practical tips.
Before diving into the installation process, it’s crucial to understand what a cable ladder system is and its purpose. A cable ladder system is a framework designed to support and organize cables in various environments, such as industrial facilities, commercial buildings, and data centers. These systems offer a versatile solution for managing cables, ensuring safety, and facilitating maintenance.
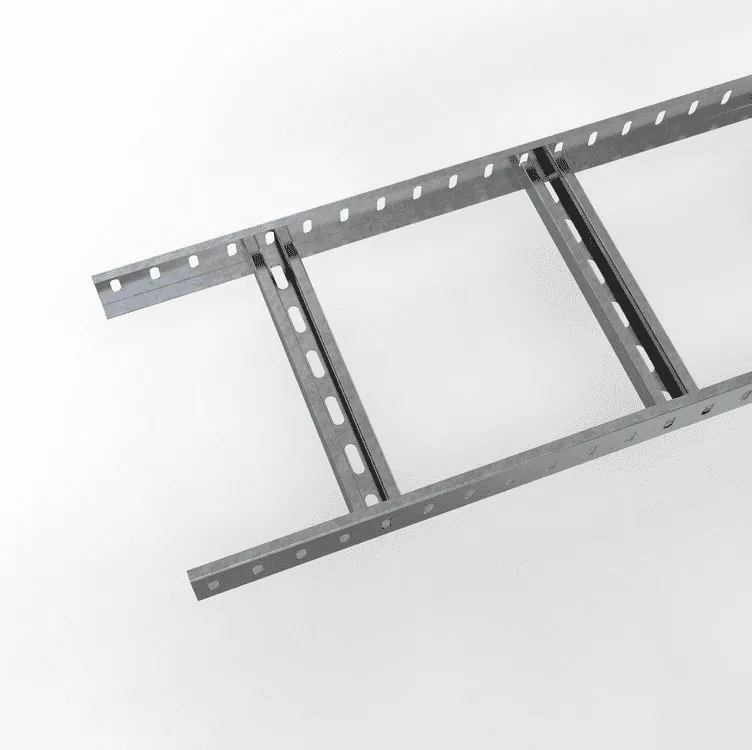
Components of a Cable Ladder System
A cable ladder system consists of several key components, including:
- Side Rails: These provide structural support and guide the cables.
- Rungs: Horizontal bars connecting the side rails, offering additional support for cables.
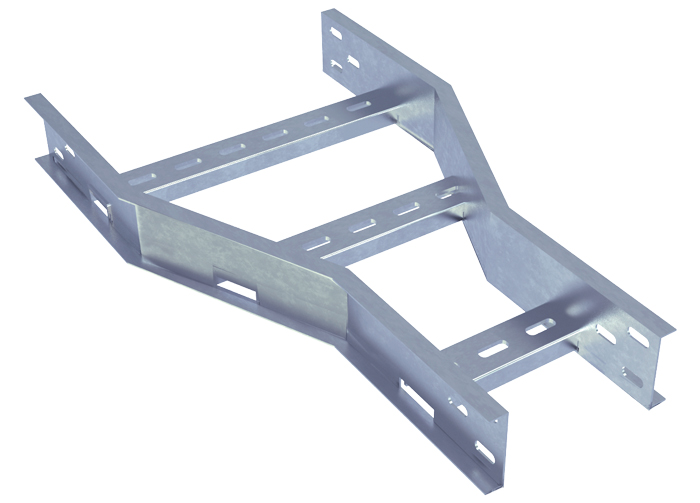
- Fittings and Accessories: These include bends, tees, and junctions that allow for direction changes and customization.
Understanding these components will help you make informed decisions during the installation process.
Preparing for Installation
Proper preparation is essential for a successful cable ladder installation. Here are the steps to follow:
Assess the Installation Area
Start by assessing the area where the cable ladder system will be installed. Consider factors like the available space, potential obstructions, and the overall layout. Identifying these elements will help you plan the installation more effectively.
Gather Necessary Tools and Materials
Having the right tools and materials on hand will streamline the installation process. Essential tools include:
- Measuring tape
- Drill and drill bits
- Level
- Wrench set
- Screwdrivers
- Safety gear (gloves, goggles, helmet)
Materials you’ll need may vary based on your specific installation but generally include:
- Cable ladder sections
- Fasteners (bolts, nuts, washers)
- Fittings (elbows, tees, crosses)
- Mounting brackets
Plan the Cable Route
Mapping out the cable route in advance will prevent unnecessary complications. Consider the following:
- Cable Tray Path: Plan a path that avoids obstacles and minimizes sharp bends.
- Expansion Guides: Include expansion joints if the installation spans large distances to allow for thermal expansion.
- Transition Points: Identify areas where the cable ladder will transition to other cable management systems or equipment.
Step-by-Step Installation Guide
Step 1: Mounting the Side Rails
Begin by mounting the side rails to the wall or ceiling. Use a level to ensure they are perfectly aligned. Secure them firmly with the appropriate fasteners. The distance between the side rails should align with the width of your cable ladder sections.
Step 2: Installing the Rungs
Once the side rails are in place, it’s time to install the rungs. Attach them horizontally between the side rails, spacing them evenly according to the manufacturer’s recommendations. Ensure the rungs are secure and level to provide optimal support for the cables.
Step 3: Adding Fittings and Accessories

At this stage, you’ll add any necessary fittings and accessories, such as bends, tees, or junctions, to customize the cable ladder system to your specific needs. This step is crucial for accommodating changes in direction or connecting multiple cable ladder sections.
Step 4: Secure the Cable Ladder
With the basic framework in place, secure the entire cable ladder system to the mounting surface using appropriate brackets and fasteners. Double-check all connections for stability and alignment.
Step 5: Laying and Securing Cables
Now that the cable ladder is securely installed, begin laying the cables onto the rungs. Ensure they are evenly distributed to avoid overloading any section. Use cable ties or clips to secure the cables in place and prevent movement.
Step 6: Final Inspection
Conduct a thorough inspection of the entire installation. Check for loose connections, ensure all components are properly aligned, and verify that the system meets safety and operational standards.
Pro Tips for Efficient Cable Management
Tip 1: Use Cable Trays and Ladder Solutions Wisely
When planning your cable management system, consider combining cable trays and ladder solutions for optimal efficiency. Cable trays are ideal for supporting smaller cables and providing additional protection, while ladder systems are perfect for handling larger cable bundles.
Tip 2: Implement Expansion Guides
In large installations, thermal expansion can lead to structural stress. Implement expansion guides at regular intervals to allow for controlled movement and prevent damage to the cable ladder system.
Tip 3: Consider Ladder Tray Transitions
If your cable ladder system needs to transition into other cable management systems or equipment, use appropriate ladder tray transitions to ensure a smooth and secure connection.
Tip 4: Regular Maintenance
Regular maintenance is vital for ensuring the longevity and efficiency of your cable ladder system. Schedule routine inspections to check for wear and tear, and promptly address any issues that arise.
Conclusión
Installing a cable ladder system doesn’t have to be overwhelming. By following this step-by-step guide, you can confidently tackle the installation process. Remember to assess your space, gather the necessary tools, and plan the cable route before you start. With the right approach and attention to detail, you’ll create a robust cable management solution that enhances safety and organization.
By implementing these pro tips, you’ll optimize your cable management efforts, ensuring a reliable and efficient system for years to come. Happy installing!