In today’s world, managing cables efficiently is crucial for both safety and organization in industrial and commercial environments. Proper installation of cable trays is essential for effective wire management. This guide will walk you through the essential steps for installing cable trays, providing you with a comprehensive understanding of the process.
Entendendo os sistemas de bandejas de cabos
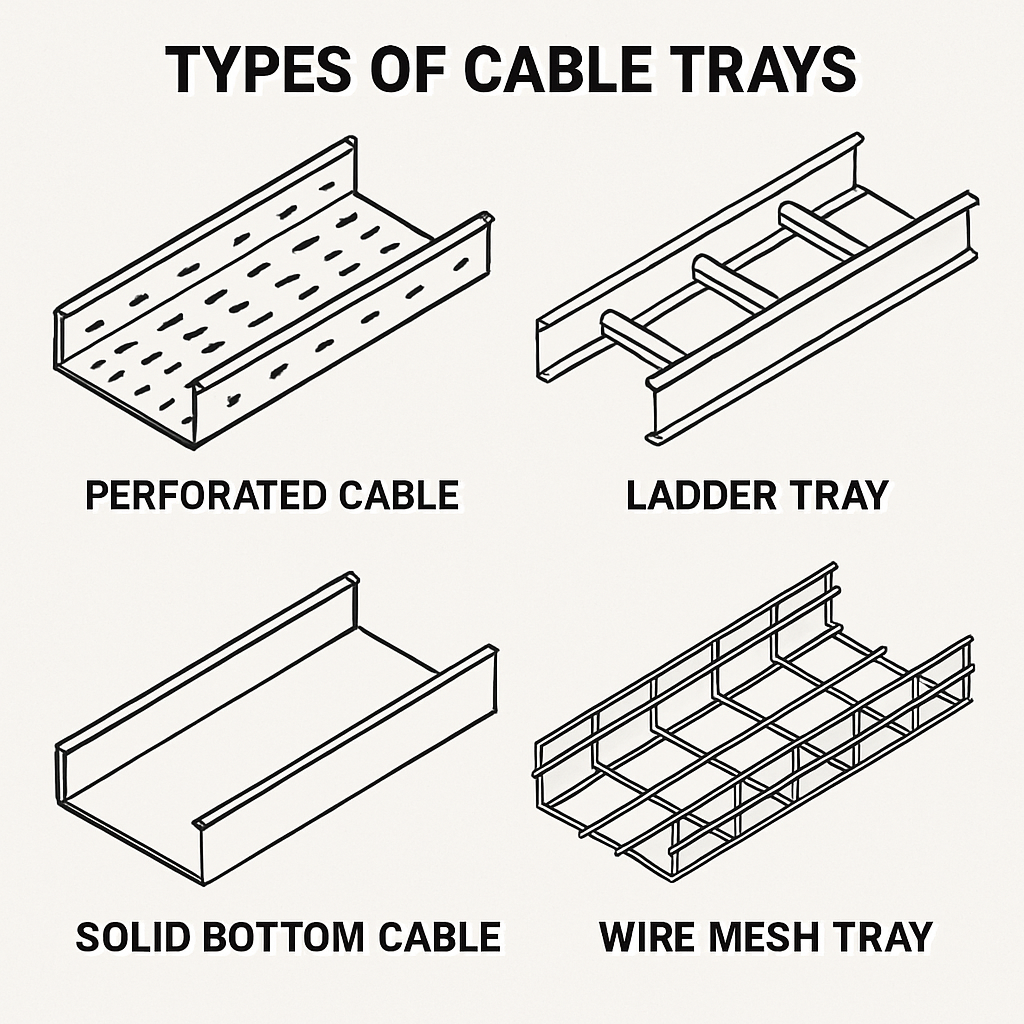
Cable trays are structural systems used to support and organize electrical cables. They provide an open framework that allows for easy access to cables and helps prevent overheating by allowing air circulation. Let’s explore the types of cable trays and their uses.
Tipos de bandejas para cabos
- Ladder Tray: Ideal for heavy-duty cables, ladder trays offer robust support and easy access to cables.
- Solid Bottom Tray: Best for minimal interference and maximum protection from external elements.
- Trough Tray: Provides moderate protection and is suitable for light to medium-weight cables.
- Channel Tray: Used for installations with a limited number of cables.
- Wire Mesh Tray: Flexible and easy to install, perfect for complex routing.
Planning Your Cable Tray Installation
Before starting the installation, it’s important to plan the layout and understand the specific requirements of your project.
Designing the Layout
- Assess the Environment: Identify areas where cable trays will be installed. Consider environmental factors like heat, moisture, and chemical exposure.
- Cable Routing: Determine the pathway for cables, avoiding sharp bends and obstructions.
- Load Calculation: Calculate the weight of cables and select a tray that can support this load.
Selecting the Right Cable Tray
Choose the appropriate type of cable tray based on the environment, cable load, and the complexity of the installation. Consider future expansion needs when selecting a size.
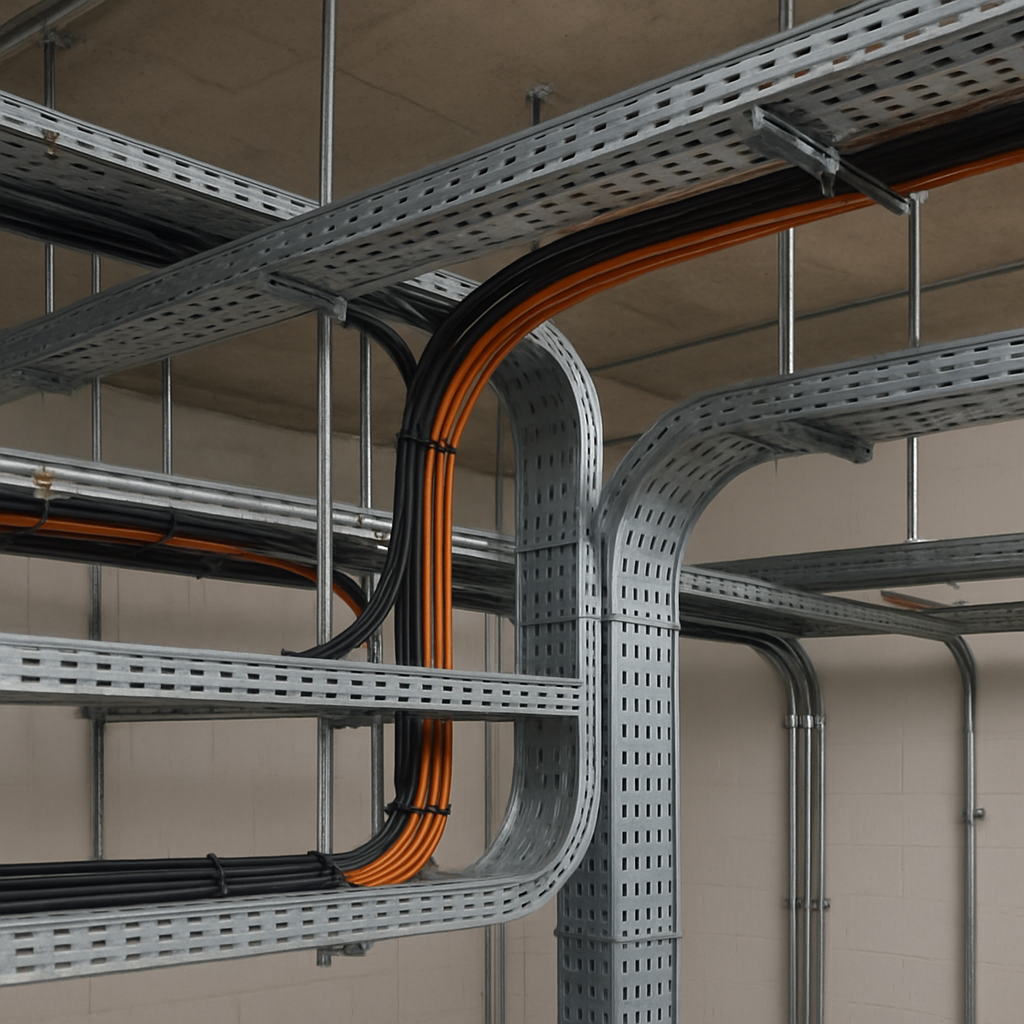
Installing Cable Trays
With your plan in place, you can proceed with the installation of your cable tray system. Follow these steps for a successful setup.
Step 1: Gathering the Necessary Tools
Ensure you have the following tools and materials:
- Cable trays and accessories
- Mounting brackets and supports
- Fasteners (bolts, screws)
- Furadeira e brocas
- Fita métrica
- Nível
- Safety gear (gloves, goggles)
Step 2: Marking the Installation Path
Using your layout design, mark the path where the cable tray will be installed. This will help you ensure that the installation is straight and aligned.
Step 3: Installing Supports
- Mounting Brackets: Attach the mounting brackets to the walls or ceiling at regular intervals. Ensure they are level and securely fastened.
- Support Spacing: Follow the manufacturer’s recommendations for spacing between supports to ensure adequate support for the tray.
Step 4: Assembling and Installing the Cable Tray
- Tray Assembly: Assemble sections of the cable tray on the ground before lifting them into position.
- Tray Installation: Lift the assembled tray sections and secure them onto the mounted supports. Use fasteners to attach the tray firmly to the brackets.

Step 5: Routing Cables
- Cable Placement: Place cables within the tray, ensuring they are evenly distributed.
- Cable Ties: Use cable ties to secure cables in place, preventing movement and potential damage.
- Bend Radius: Maintain a proper bend radius for each cable to avoid stress and potential breakage.
Step 6: Final Checks and Adjustments
- Alignment Check: Ensure all trays are aligned and level.
- Secure Fasteners: Double-check all fasteners and connections for stability.
- Label Cables: Label cables for easy identification and future maintenance.
Tips for Effective Cable Tray Installation
- Regular Maintenance: Schedule regular inspections and maintenance to ensure the integrity of the cable tray system.
- Future-Proofing: Allow extra space in the tray for future cable additions or modifications.
- Compliance: Ensure the installation complies with local electrical codes and standards.
Common Mistakes to Avoid
- Overloading the Tray: Avoid exceeding the maximum load capacity of the tray.
- Improper Support Spacing: Ensure supports are spaced according to manufacturer guidelines to prevent sagging.
- Neglecting Bend Radius: Maintain the recommended bend radius to prevent cable damage.
Conclusão
Installing cable trays is a critical task that requires careful planning and execution. By following these essential steps, you can ensure a safe, efficient, and organized cable management system. Proper installation not only enhances safety and reliability but also facilitates easy maintenance and future upgrades.
Whether you are setting up a new system or upgrading an existing one, understanding the nuances of cable tray installation will help you achieve optimal results. Remember, a well-installed cable tray system is key to effective wire management and a safe electrical environment.